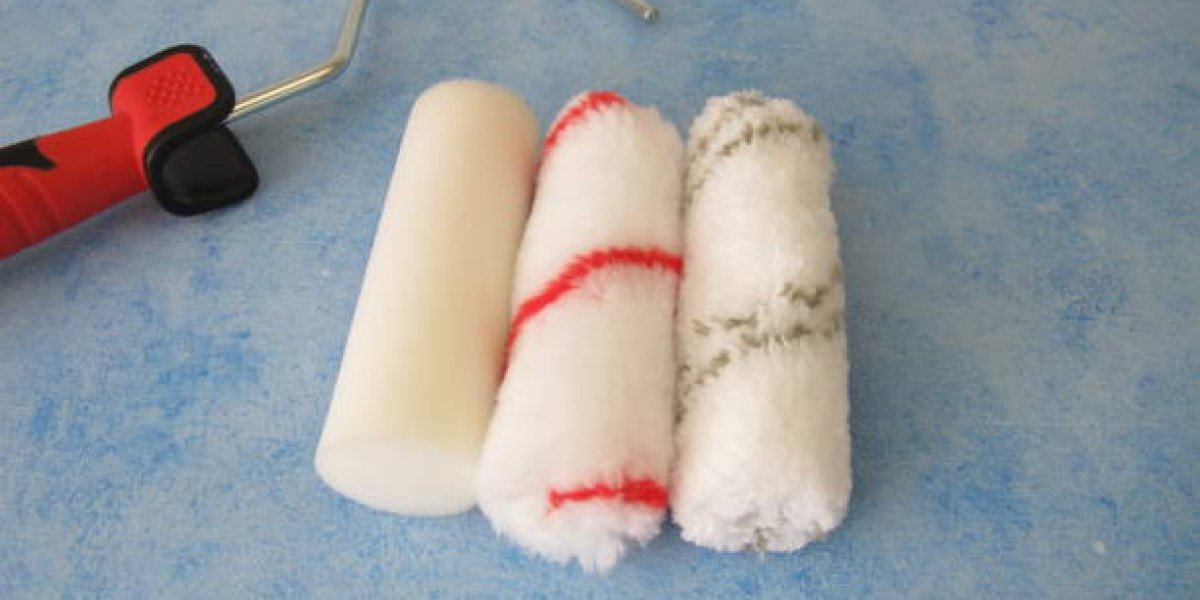
Paint gets expensive. Rollers add up. And tossing a perfectly usable sleeve just because it’s messy feels wasteful. I’ve been there. More times than I want to admit. If you’re using a paint roller refill 4 inch setup for trim, doors, or tight spaces, learning how to clean it properly isn’t just about saving money. It’s about keeping the finish consistent and not sabotaging your next coat before you even start.
Most people ruin roller refills during cleanup, not during painting. They rush it. Or overdo it. Or let the paint dry too long because “I’ll deal with it later.” That’s usually the beginning of the end. The good news is, you can reuse a roller refill several times without losing performance, as long as you treat it right.
Why Roller Refills Lose Performance in the First Place
Performance doesn’t disappear magically. It’s usually clogged fibres, dried paint at the core, or a sleeve that’s been twisted like a wet rag one too many times. Roller fibres are designed to hold paint evenly. When those fibres get packed with half-dried paint or crushed flat, they stop doing their job.
Another issue is mixing paint types. Water-based today, oil-based tomorrow. That’s a mistake. Even if it looks clean, residue stays in there. It hardens later. Then you’re wondering why your roller feels stiff and leaves weird texture marks.
Clean It Immediately, Not “Later”
Timing matters more than technique. Clean your roller refill as soon as you’re done painting. Not after lunch. Not tomorrow morning. Right then. Wet paint releases easily. Semi-dry paint fights back.
If you’re taking a short break, wrap the roller tightly in plastic or foil. No air. No drying. That alone can extend the life of a refill by a lot. But once the job’s done, it’s cleanup time, whether you like it or not.
Step-by-Step: Cleaning Water-Based Paint from a Roller Refill
Start by scraping off excess paint. Use a putty knife or the edge of a roller tray. Don’t press too hard. Just get the bulk off. Less paint means less work.
Next, rinse under warm running water. Not hot. Warmth loosens paint without damaging fibres. Spin the roller with your hand while rinsing so water pushes paint out from the core. You’ll see the water change colour fast.
Add a small amount of dish soap once most of the paint is gone. Work it into the nap with your fingers. Squeeze gently. No wringing. Rinse again until the water runs clear and the roller feels soft, not sticky.
Oil-Based Paint Takes More Patience
Oil-based paint is a different animal. You’ll need mineral spirits or paint thinner. There’s no shortcut here. Pour a small amount into a bucket, roll the sleeve back and forth, and let the solvent do the work. Don’t soak it forever. A few minutes is enough.
Once clean, rinse with warm soapy water to remove solvent residue. This step matters. Skip it, and your next paint job will smell awful and feel wrong. Finish with a clean water rinse.
Drying Without Wrecking the Fibres
This is where people mess up. They twist the roller like they’re wringing out laundry. That crushes the nap. Instead, shake it hard outside or in a sink. Then run your hand along the fibres to fluff them back up.
Stand the roller refill on its end to dry, or slide it back onto the frame and hang it. Airflow matters. Laying it flat keeps moisture trapped at the core, which leads to mildew or stiffness later.
How to Store a Clean Roller Refill
Once dry, store it in a dust-free place. A zip-top bag works fine. Don’t seal it if there’s any moisture left. That’s asking for trouble. Label the bag if the roller was used with a specific paint type or colour. Sounds obsessive, but future-you will appreciate it.
If the refill feels stiff when you pull it out weeks later, rinse it with warm water before painting. Sometimes fibres just settle. It’s not always damage.
When Reuse Actually Hurts Your Finish
Not every roller refill deserves a second life. If the nap is matted, shedding, or uneven, let it go. Reusing a bad roller costs more in time and touch-ups than a new sleeve ever will. Especially on smooth surfaces where texture shows everything.
Cheap refills degrade faster. That’s just reality. Higher-quality ones, cleaned properly, can handle several projects without issue. You’ll feel the difference when rolling.
Big Rollers, Bigger Cleanup Responsibility
Larger rollers amplify mistakes. If you’ve ever cleaned something like an 18 inch epoxy roller, you know there’s no half-measure cleanup. Epoxy sets hard. Miss a spot during cleaning, and the roller becomes a brick. The same rules apply, just scaled up. Work fast, use the right solvent, and don’t rush the drying stage. Bigger tools punish laziness more aggressively.
A Quick Reality Check Before the Next Job
Before reusing any roller refill, run your hand over it. It should feel even. No crusty patches. No stiff bands near the core. Spin it once on the frame to make sure it rolls freely. If it passes those checks, you’re good to go.
Skipping this check is how people blame paint, walls, or weather when the problem was the roller all along.
Conclusion: Reuse Is About Respect, Not Just Savings
Cleaning and reusing a paint roller refill isn’t complicated, but it does require respect for the tool. Rinse it too late, twist it too hard, or store it damp, and performance drops fast. Do it right, and that same roller will lay down clean coats job after job. It’s not about being cheap. It’s about working smarter, wasting less, and not fighting your tools the next time you open a paint can.