Mastering the Art of Illumination: Lighting Techniques Used in Professional Product Photography Studios
In the world of e-commerce and commercial advertising, your product is only as good as it looks. While a high-resolution camera is essential, professional photographers know that the real magic happens with lighting. It is the language that communicates texture, value, and mood to the customer.
Whether you are shooting high-end jewelry, matte-finish electronics, or organic skincare products, understanding how professional studios manipulate light is the key to transforming a flat image into a tangible, desirable object. This guide dives deep into the advanced lighting techniques used by industry experts to create scroll-stopping imagery.
The Physics of Light: Quality and Direction
Before setting up a single stand, professionals analyze the "quality" of light. This isn't about good or bad, but rather the hardness or softness of the shadows produced.
Hard Light vs. Soft Light
Hard Light: Produced by small, focused light sources (like a bare bulb or the sun on a clear day). It creates sharp, defined shadows and high contrast. Studios use this to emphasize the texture of rugged products like tactical gear or to create a dramatic, "edgy" look for perfumes and spirits.
Soft Light: Created by large light sources relative to the subject (like a giant softbox). It wraps around the object, blurring the transition between highlight and shadow. This is the gold standard for cosmetics and food photography, where the goal is an appetizing, flawless appearance.
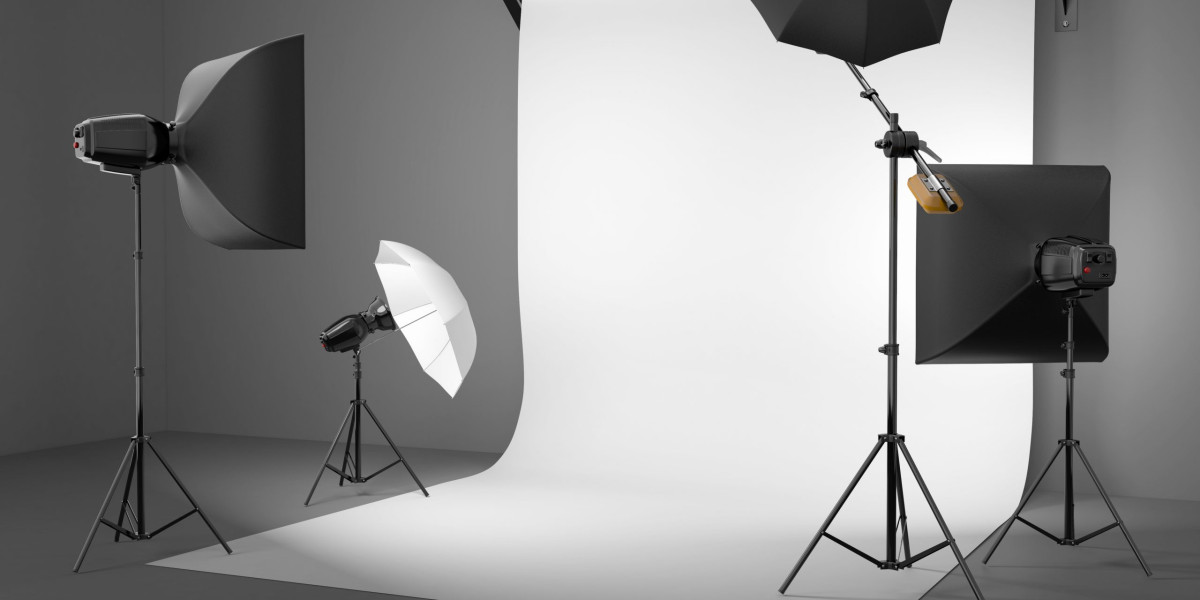
The Standard: Three-Point Lighting Setup
Every professional studio starts with the fundamentals. The three-point lighting setup is the skeleton upon which most product photography is built.
1. The Key Light
This is your main light source. In a product shoot, it is typically placed at a 45-degree angle to the subject. It defines the primary highlights and form of the product.
2. The Fill Light
Placed opposite the key light, the fill light is softer and less intense. Its job is to lift the shadows created by the key light, ensuring that details aren't lost in the dark.
3. The Backlight (or Rim Light)
Placed behind the subject, this light separates the product from the background. It adds a "halo" effect to the edges, giving the image depth and dimension.
Specialized Techniques for Difficult Materials
Professional studios distinguish themselves by how they handle "tricky" surfaces. Photographing a matte box is easy; photographing a chrome watch or a glass bottle requires distinct expertise.
Mastering Reflections on Metal and Glass
Shooting highly reflective objects is less about lighting the object and more about lighting what the object reflects.
Double Diffusion: Pros often use two layers of diffusion material to create a creamy, seamless highlight on glossy surfaces.
Negative Fill: Instead of adding light, photographers place black cards (flags) around the product to block stray light. This adds black "edges" to glass or metal, defining the shape of the object against a white background.
Enhancing Texture on Fabrics and Leather
Flat lighting kills texture. To show the weave of a fabric or the grain of leather, studios use Raking Light. This involves positioning the light source at a very low angle to the surface of the product. The light "rakes" across the texture, creating microscopic shadows that reveal the tactile quality of the material.
The Importance of the Right Studio Environment
While knowledge is power, the physical environment plays a massive role in the final output. Controlling ambient light is critical; you cannot have stray window light changing the color temperature of your shot. This is why many professionals prefer renting a dedicated space where they have total control over every photon.
If you are looking for a professional workspace to execute these techniques, finding a well-equipped studio near me that offers high ceilings, ample power supply, and light-blocking capabilities is the first step toward industry-standard results. A proper studio environment allows you to manipulate light without fighting the limitations of a home office or garage.
Modern Hybrid Studios: Video and Audio Integration
In 2025, product photography rarely exists in a vacuum. Brands now demand "sizz reels," unboxing videos, and social media clips alongside static images. This shift has led to the rise of hybrid studios that are acoustically treated as well as visually equipped.
Lighting for video requires continuous lights (LEDs) rather than strobes (flash). These lights must be silent (fanless) to avoid interfering with audio capture. When planning a comprehensive product launch, it is often efficient to book a facility that doubles as a recording studio so you can capture clean voiceovers or interview clips on the same day you shoot your product visuals.
Essential Light Modifiers Checklist
To achieve the looks described above, professional studios utilize a specific toolkit. Here are the must-haves:
Softboxes and Octaboxes: For mimicking natural window light.
Snoots and Grids: For focusing light into a tight beam to highlight a specific feature, like a logo.
Scrims: Large diffusion panels used to soften harsh lights.
Reflectors (Bounce Cards): White, silver, or gold cards used to bounce light back onto the subject.
Conclusion
Mastering product photography lighting is a journey of understanding physics and artistic intent. It requires moving beyond simple illumination to true "light shaping." By utilizing techniques like three-point lighting, negative fill, and raking light, you can elevate your product images from simple snapshots to compelling commercial assets. Whether you are building a home setup or renting a professional facility, remember that light is your most powerful tool in storytelling.